Five Components...
Firstly your longcase/grandfather clock should have five components. Two weights, one pendulum, one movement, one trunk and one hood. To begin with you will need to decide where the clock will be situated. This can obviously be anywhere in your house but you will need to be careful when placing them near radiators or other sources of heat due to the possibility of damage to the case. Also placing them near a bedroom may cause problems but if the clock has a Strike/Silent facility then the strike can be turned off. The majority of London longcase/grandfather clocks have the Strike/Silent function but this can also be found on many provincial longcase/grandfather clocks.
Tools Required...
The tools required to set-up your longcase/grandfather clock are as follows. Screwdriver, screws for fixing the movement to the seatboard, screws for fixing the trunk to the wall (if required), drill, block for wall (if required), masking tape and some small wooden blocks to level the trunk up against the wall.
Screw to the Wall...
When we deliver a longcase/grandfather clock we always suggest that they are screwed to the wall. If a longcase/grandfather clock is not screwed to the wall they can sometimes become unsteady and begin to stop. Screwing them to the wall is firstly to keep the clock firm against the wall and secondly for security. If the clock is to be placed on a carpeted surface then the need for screwing the clock to the wall will be reduced as they tend to sit very well on a carpeted surface. If however the clock is to be placed on a wooden or stone floor then it will almost certainly need to be fixed to the wall. Over a period of time on this type of surface a longcase/grandfather clock will begin to move away from the wall and subsequently if this happens the clock may start to stop if the pendulum touches the backboard.
Trunk of the Clock...
The first job is to place the trunk of the clock against the wall. Using a level make sure the clock is straight. This is not absolutely necessary to make the clock work properly as the clock can be adjusted later in the set-up process but the clock must be straight to the eye. You may need to use the small wooden packs to level the clock under the front corners of the trunk. Depending on the clock or floor you may need to use more packs on one side than the other.
Great Care...
Once this is done you may then place the movement onto the cheeks of the case making sure that the brass pulleys attached to the barrel line are hanging freely into the case. Great care needs to be taken when doing this as some longcase/grandfather clock movements can be quite unsteady on their cheeks. You may need some assistance if you are on your own at this point. One person can hold the movement on the cheeks whilst the other can pick up the pendulum and lower it into the case. The pendulum will then need to be threaded up towards the bottom of the movement, through the loop of the crutch and finally onto the back cock of the movement. Now the pendulum is on the movement it should be safe to let go as the weight of the pendulum will hold the movement on the cheeks.
Five Components...
Once the movement is safely positioned on the cheeks and the pendulum is keeping it in position you can then slide the hood onto the trunk. This is done by lining up the wooden rails on the trunk with the rails on the inside of the hood. Push the hood as far as it will go so when you run your finger along the bottom moulding that sits against the moulding of the trunk there should be no gaps. If there is a gap you may need to move the movement back on the cheeks. You can do this by reaching up inside the case and adjusting the seatboard as you need to.
Remove the Hood...
Once you have the dial in a central position behind the masking of the hood you can then remove the hood. When we deliver our longcase/grandfather clocks we nearly always screw the movements down to the cheeks. This is done to prevent the movement from moving backwards over time and making the clock stop. There are some cases where screwing the movement down is not possible such as the cheeks are just too thin to screw into. Most of the movements were nailed down originally but screwing them down makes life much easier in the future when you wish to move the clock. Normally only very small screws are required, just enough to obtain a fixing into the cheeks.
Be aware that sometimes the cheeks can split when this process is carried out so choose the available holes carefully.
Hang the Weights on the Pulleys...
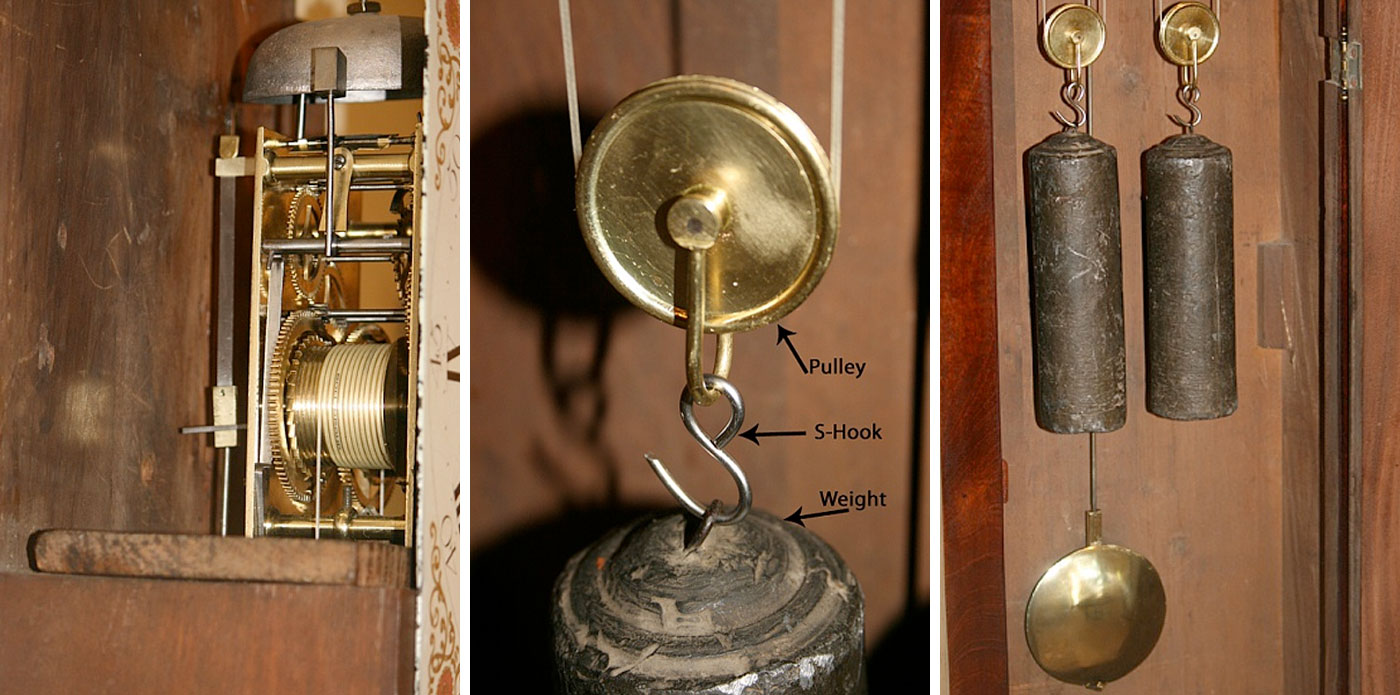
When the movement is all screwed down and perfectly secure you can then hang the weights on the pulleys. If the gut on each barrel has been allowed to run down then you can insert a winding key into one of the winding holes on the dial. Holding the gut quite tightly wind in a clockwise direction. As you wind you should be able to look round the side of the movement to make sure that the gut is successfully winding itself around the barrel.
Great care needs to be taken here that the gut doesn’t jump off the barrel and start winding itself around the actual winding arbour which is in between the barrel and the front plate of the movement. If this does happen the whole movement may need to be dismantled to solve the problem. Once you have the pulley at a suitable height and the gut is around the pulley, take one of the weights and hang it onto the hook at the bottom. Some pulleys have hooks and others just have a loop. Its normal practice to hang the heaviest weight on the striking side which is the left side on an antique longcase/grandfather clock but occasionally there is an exception to this rule.
Now you have your longcase/grandfather clock completely set up and everything in the correct position you can see whether the pendulum will swing without touching the backboard. You will also need to check whether it clears the weights.
Compensate for the Skirting Board...
You will almost certainly need to put either a thin or thick block behind the clock to compensate for the skirting board. This will also solve the problem of the pendulum touching the backboard. Once you have chosen your block you can then select an existing hole in the backboard to use for fixing it to the wall. Mark through the hole onto the wall with a pencil or small screw driver.
If you are screwing the case to the wall you will need to remove the whole clock but obviously in reverse order to the process above. So you don’t need to let the gut down you can place some masking tape over the barrels to keep the gut on the barrels after you take the weights off.
There are two ways of fixing the block to the wall...
You can either screw straight through into the wall or you can fix the block to the wall with two screws and then screw the case to the block. Both methods will make the clock very stable. If the floor surface is quite slippery you may need to secure the case with two blocks, one at the top and one at the bottom.
Re-assemble the whole clock when you are happy with the wall fixing and then swing the pendulum.
Listen to the tick...
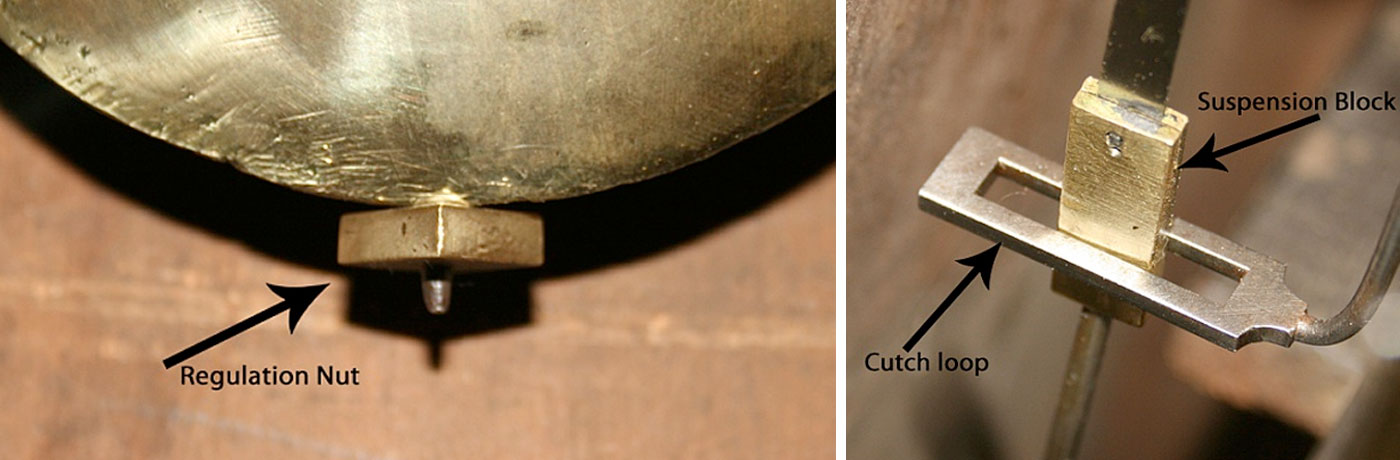
If the tick is uneven then you will need to adjust the crutch to obtain an “In Beat” tick. Holding the pendulum bob in a central position move the bob to the right and then back to the left. If the longest gap is when the bob is swinging to the right then the crutch needs to be bent to the left and if the longest gap is when the bob is swinging to the left then the crutch needs to be bent to the right. With small adjustments on both sides you should obtain an even tick. If the tick is uneven the clock will usually stop. It’s also important to make sure that the suspension block is in a central position within the crutch loop. Bending the crutch either forward or backwards will solve this problem.
Your longcase/grandfather clock should now be ticking...
To put the clock to the correct time you should always move the minute hand in a clockwise direction until you reach your current time. You must allow the clock to strike as you come to each hour or striking problems may arise. One of the main rules for antique longcase/grandfather clocks is never to turn the hands backwards. This can result in damaging the movement and it will probably need to be repaired.
The date will also need to be adjusted if the clock has one. This can usually be done from the front of the dial by moving the date ring or disc to the correct date. If there is resistance then the date is currently in gear and you will have to take the clock forward in time to ascertain when the date changes. The dates on longcase/grandfather clocks change either every 12 hours (half a day) or they change once every 24 hours. You can also change the date by removing the hood and locating the disc or ring behind the dial.
You may need to regulate the clock over the next few hours or days...
To do this you adjust the Regulation Nut at the bottom of the pendulum. If you turn the nut to the right you will speed up the clock and if you turn it to the left you will slow down the clock.
The last process of the setup is winding the clock up. As before place the winding key into one of the winding holes and wind in a clockwise direction. As you do this it’s advisable to have the trunk door open so you can see the weights as they travel upwards into the case. As you approach the top slow the winding down and you will feel the brass pulley touch the bottom of the seatboard.
Your longcase/grandfather clock is now fully assembled
The above procedure may be quite lengthy but it’s actually quite a simple process. All the longcase clock/grandfather clocks sold by P. A. Oxley are fully installed by us in the United Kingdom.